Today was the one day this week that I had to go to my actual job that pays my bills, so I couldn’t work on Junebug. Luckily that’s over now and I can get back to the fun stuff. ![]()
I decided to make a list of everything I need to do before I put the new skin on Junebug. I have other projects that I would probably rather work on, but I need to prioritize. The skin is supposed to arrive tomorrow between 3 and 6pm, according to the freight shipping company. When I posted my complaints about dealing with the shipping company on http://vintagetrailertalk.freeforums.net/ it was funny how many others had similar experiences. Apparently, freight shipping companies really hate customers like me who order heavy items to be delivered to my residential address. I called my friend Jennifer to come over tomorrow during that window to help me unload the boxes. They will each be 11 feet long, not sure how wide, and weigh about 100 pounds each. My AC unit that I got for Junebug weighs 50 lbs and I can lift it no problem, so I am pretty sure we can lift those boxes. Fingers crossed!
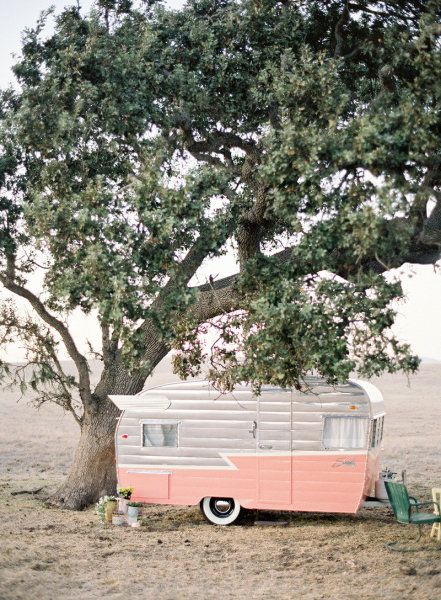
To give you an idea of the exterior look that I’ll be going for on Junebug, here’s a picture of another camper with a similar design. I would like to keep the top half silver as well and paint the bottom half a lavender color. I still haven’t decided on the stripe, I thought about doing the white stripe like the pic below, but I also thought a light green stripe would be fun. It would definitely give it a different look with the green stripe.
Here’s the list of things I need to accomplish before Saturday, when I have three friends coming over to help me put the skin on.
- Run new 12 gauge wires along roof to receptacles and relocate breaker box to spot under the bed and exterior power inlet to a lower spot on the street side of Junebug. (Need to order the new plug and power box, but I can buy the wires for now and get those in before the skin)
- Install one more piece of wood along the bottom rear of Junebug for skin to attach to, will need to modify slightly from original design due to the steel beams sticking out of the back for the bumper.
- Finish running the wiring for the running lights and license plate light and hook up to car to test.
- Paint undercarriage with black fence post paint after spraying some sealant on the seam of the metal flashing along the rear undercarriage (just to be extra sure it’ll stay dry).
- Finish building a new frame and support beam for the roof vent and install.
- Purchase rigid foam insulation and install (I’ll do this last on this list).
And a list of things left to do that can be done after the skin is on:
- Finish upgrading the electrical system to 30 amp once parts are in: Install new power box, update circuit breakers, install new 30 amp plug for power inlet, etc
- Add finishing trim along seams in the paneling as well as trim around kitchen countertop and backsplash.
- Finish building new frame for bed and benches, apply shellac, and install.
- Modify old cushions to fit new layout
- Install air vents in the appropriate locations for the new AC.
- Finish cleaning all windows and polish the aluminum.
- Strip old paint off of door hardware, window eyebrows, and j-rail.
- Re-install windows with new putty tape and stainless steel screws as well as j-rail and eyebrows.
- Install Fantastic Vent in roof and seal.
- Apply shellac to the interior of the new door and add new skin to exterior of door, then install.
- Repeat same process for the baggage door.
- Finish painting closet/bathroom purple.
- Add finishing touches on interior like hanging curtains, pictures, add bedding, etc.
- Hopefully finish by end of July so I can take Junebug to my grandma’s house to show my family.
- Have unveiling party for Junebug and invite all of my friends and family who wonder where I’ve been all this time and are starting to worry about my obsession.
- Go to first vintage camper rally in September!
So, I still have a lot left to do, but I think I can do multiple things on the list in one day, so hopefully I can make good progress over the next few weeks. I had better get to work studying electrical circuits tonight since I am now going to be doing that project myself too. Thank goodness for the internet!

I am working on restoring my own camper and was wondering where you ordered your skin from? I’m having a hard time locating some… I was also wondering if you had to scrape any rust off your trailer and how you did that? I was looking into sandblasting, but it’s also very expensive… thanks for your help!
Hi! I ordered the skin from Hemet Valley RV in California. I tried to find a place that could make it with the correct brakes in the metal in the size I needed locally, or even anywhere in Texas, but I had no luck. The skin itself wasn’t too expensive but the shipping to Texas doubled the price. It was totally worth it though because I got the pre-polished aluminum with clear coat and it’s still very shiny almost two years later! I didn’t have to remove any rust because I replaced all the skin. I just painted over the rust on the frame with Rustoleum and its holding up fine. Good luck with your restoration!
Thank you so much for your advice! My camper is slowly being torn apart at the moment, the whole thing needs rebuilt from the frame up sadly. New pictures will be up soon! Thanks for checking my page!